Showing posts with label rant. Show all posts

Friday, December 17, 2010

The Cookie that Almost Nearly Was, But then Suddenly... Wasn't

Tonight I made midnight cookies. You know, the cookies you bake at 11:30 at night because you absolutely need those effing cookies or else--oh my god--there is no way you will be able to sleep because it's the lack of sugar that's keeping you from sleeping. Naturally. Of course. That makes perfect sense.

It was bad.

Usually I can justify the "badness" of any baking disaster by saying that while it may have looked and smelled awful, it tasted delicious. That was not the case here. These "oatmeal cookies" tasted like Ebola and looked like a festering buboes.

There will be no pictures of this incident. Instead, I will share with you this lovely picture of a ladybug on a leaf.

And a random crazy person on a beach.

Exciting.

However, I should mention that I wore black leggings with thick wool leg warmers today. Felt like I belonged in Flashdance. Maybe people even thought that I might be a dancer. Possess some grace... elegance... poise... The leg warmers obviously gave me a false sense of security that could not be met by the late hour and extreme exhaustion.

I will wear them again tomorrow.

Friday, December 10, 2010

I AM ... The Secret Santa


This year for my Secret Santa gift I had decided that no matter whose name I pulled out of the hat, I would bake something for that person that I was sure they would love. This was mostly because I had stumbled on a lovely rack of packaging for baked goods at Michael's that I couldn't help but spend too much money on. It was all planned out perfectly, until the name I pulled out of the hat belonged to a woman who cannot have any gluten. I was a bit bummed until I realized that this was the perfect opportunity to make some more macarons. I could experiment and try out some of the fancy oils and extracts that I have collected (not hoarded!!). I settled on three different kinds of shells-- pistachio, raspberry, and vanilla-- and three different fillings--custard, anise buttercream, and lemon buttercream.

Making the macaron shells was easy enough, although after the 100th little cookie I did learn that there are definitely some tricks and shortcuts that make them a lot less intimidating. However, that being said, the best trick is to read the recipe fully before you even start (for some reason, I still haven't fully learned that one...). Layering your baking sheets will definitely make your cookies thinner and sexier, but you will have to adjust your baking time or else you'll be wondering why they're still raw inside after they've been in the oven for nearly an hour. And not all sil-pat baking sheet covers will allow you to effortlessly peel off your freshly baked macs. In fact, I would say stay away from the sil-pat mats all together and just use parchment paper for this one. So much easier.

Also, as tempting as it is to buy the expensive raspberry extract from the specialty food store because it MUST be delicious... just don't do it. Seriously. It's not delicious. I have never in my life tasted a raspberry that tasted quite that potent and... terrible. The extract made the macs taste very strong and alcoholy, but combined with the anise buttercream, they were really nummy.

Unfortunately too, I have to say that my lemon buttercream ended up tasting like lemony fresh sunlight soap. Stupid lemon extract. Next time, I will stick to lemon rind or lemon oil, I promise. Lesson learned. Mostly. The anise extract made for absolutely scrumptious buttercream that I ate by the spoonful. Dangerous.

Saturday, September 25, 2010

Pumpkin Loaves of Lub


That's "lub", not "lube", you crazies! Everyone always gets that wrong...

Anyway!

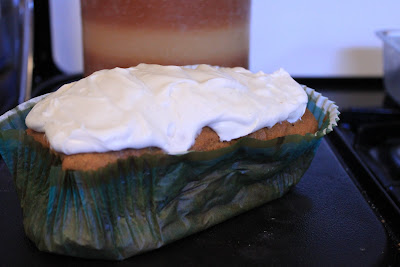
I made these pumpkin loaves and I was told that they were delicious. I don't really know whether they were or not myself because they were all gone and eaten before I could get a taste. The loaf itself was a pretty strait forward pumpkin loaf with walnuts just topped with an exceptionally delicious cream cheese icing flavored with lemon and vanilla bean. I'm told that they were moist and light--not heavy and dense like most pumpkin loaves that you find around town (shameless self promotion right there...). Instead of the required vegetable oil, I used some walnut oil that I found sitting at Winners and I think it really helped bring out some of the flavor. It's the little things.

The challenging part of these little loaves were the silly little loaf liners designed by the geniuses at team Paula Deen. Too awkwardly sized for any rational loaf pan, these liners look cute, but only cause unnecessary frustration. To make them fit better, I filled the empty space with aluminum foil, and this is the result:

The only thing that saved me from extreme shame at these misshapen trolls of the loaf/cake world were the adorable little boxes that handily went with the liners (all on sale at Michaels for 70% off!). I almost look like some kind of professional when I use these!

If you want to make these for yourself, they're very simple--just your basic muffin method at work here! I doubled this recipe easily and substituted walnut oil for vegetable oil, but other than that, this is pretty much it.

Pumpkin Walnut Bread
Adapted from The Art and Soul of Baking by Cindy Mushet

2 cups all-purpose flour
3/4 tsp baking soda
1/2 tsp cinnamon
1/4 tsp allspice
1/4 tsp ground cloves
1/4 tsp ground ginger
1/4 tsp salt
2 large eggs
1/3 cup water
1 1/2 cups sugar
1 cup canned pumpkin puree
1/2 cup vegetable oil
1 tsp vanilla
1 cup chopped walnuts (toasted)

1. Preheat oven to 350ºF. In a large bowl whisk together first seven ingredients until thoroughly blended. In a separate bowl, whisk together eggs, water, sugar, pumpkin, oil, and vanilla.

2. Add the pumpkin mixture to the dry ingredients and whisk until blended and smooth. Add walnuts and stir. Pour batter into prepared loaf pans and level off the tops.

3. Bake for 55-65 minutes, until the bread is firm to the touch and a toothpick inserted into the centre comes out clean. Transfer to a rack and cool before adding cream cheese frosting.

For Cream Cheese Frosting:
Combine 12 ounces softened cream cheese, 3 ounces softened unsalted butter, finely grated zest of one lemon, 10 ounces powdered sugar, and 1 1/2 tsp vanilla in a mixer. Beat until smooth.

Thursday, August 26, 2010

The Frog Cake


I did this cake a couple months ago and kind of forgot about it. The pictures lingered in my computer waiting to be posted and in the meantime I let the story behind them slip out of my mind. All I could really remember was that it was four layers of chocolate cake with vanilla butter cream and caramel sauce. But like any of the cakes that I do for (a teeny) profit, this one brought with it some drama.

For instance, the caramel dome that was supposed to contain the little frog shattered leaving me with dozens of shards of caramel and a frog with no where to go. Also, the little tadpoles ended up looking more like green mutant sperm than anything else... not really something you want to be thinking about while serving a two-year-old some birthday cake. Also, I think I made that caramel sauce for in the cake at least seven times.

If nothing else, I regret not going with my first instinct with this cake, which was to make the entire thing into a frog sculpture (kinda like this). I chickened out though, and instead tried to make something more like a little frog in some bulrushes with his little tadpoles (or mutant green sperms) beside him. The next one will be better, I promise!

Saturday, August 21, 2010

The Odyssey (or, Three Cakes of Gigantic Proportions)


Making cake is difficult. It doesn't look difficult, and even when you break it down into it's component parts, it almost doesn't seem difficult. But trust me--it is. Then add to the already difficult state of difficultness the fact that you don't have a vehicle (other than your own legs) and you're working completely alone. The level of difficulty is suddenly compounded by a factor of seven.

I always thought cake was easy. I figured that was why so many people went into the cake business instead of, say, French or Viennese pastry, which is notorious for being finicky and temperamental. Cake itself is simple: butter, flour, eggs, sugar, and flavour. Mix it together, stick it in the oven, and it's done. Swiss Meringue Buttercream, fairly strait forward: egg whites, sugar, heat and beat then add butter--it takes some practice and maybe somebody walks in and things you're actually a sailor with Tourette's, but once you get the hang of it, it's a walk in the park. You could even say that after finding your groove with sugar paste flowers and decoration that too becomes something you could do in your sleep.

However, what you don't take into account is the timing, organization and planning that is critical to making cake without feeling the need too cry in a corner and pull out your own hair. This I learned the hard way.

It seemed innocent enough: Lemon Cake for 70 people. No rolled fondant coating. No fancy pipe work. No tiers. Simply, three Lemon Cakes iced with Lemon-Vanilla Swiss Meringue Buttercream, each decorated with a spray of pink sugar paste roses and rose buds. Simplicity was the key.

Except for it wasn't. Without a vehicle, daily trips to the grocery store and back hauling my own weight in butter, sugar and eggs became a grueling task that I quickly grew to hate. Once home, I'd unload the bags from my aching arms, change into my purple short shorts, prepare my mise en place and get to work. Turns out that to make two 4 layer cakes that are eight inches in diameter and one 4 layer cake that's 14 inches in diameter takes two days, five pounds of butter 2 pounds of sugar and 4 dozen eggs. And those are just the easy numbers! Blood, sweat and tears baby. Because in the middle of the summer, baking cakes without air conditoning can be very hot. Sweaty. Kinda gross.

It's hard to plan for excessive heat, just like it's hard to plan for a burnt cake. You've got to work with what you've got and if you can't do that then... well then you've got to make another trip to that god awful grocery store. On foot.

And a word to the wise, don't think you're doing yourself a favor by buying that extra pound of butter at the Seven-11 around the corner instead of walking to the 12 blocks to Safeway. Seven-11 unsalted butter is $8.46/lb. Couple pounds of that and your net profit is definitely screwed.

In the end I can complain about all the little things that went wrong with these cakes. The buttercream that I had to triple; the cakeboards that I lost; the finger that I ripped open; and even the two pounds of desperate Seven-11 unsalted butter that cost me $16.92 (plus tax!); the fact that I made enough cake to feed about 200 people and still have some left over. But in the end, I'm so proud of how these cakes turned out--exactly the way I wanted them.

I think they tasted pretty good too.

Friday, March 26, 2010

Project Cake Number THREE and my SECOND cake commission

It's hard for me to decide where to start this post and what exactly to do with it. This week I had two multi-tiered cakes due that both needed to be decorated to perfection while still maintaining my high standards for taste (ha! how's that for high class food jargon!). I've always struggled with timing when bake, so this week I made an exact schedule that I was to follow to the minute if I was going to finish these cakes, go to work, and maintain some semblance of sanity. A very loose semblance of sanity.

But like anything, there were many phases that I went through to complete these two cakes on time and without throwing any sharp objects.

Phase One: Excitement
It was at this (misguided) first phase where I decided it would be a good idea to go for a three teir cake and a two teir cake. Lasting approximately 3 days, I made over two dozen fondant roses and rose buds in various creamy pastel colours while watching BBC dramas on the tv. After taking out every baking book I owned, I settled for a "simple" sponge cake that I could put together and freeze no problem. I would also whip up a marscapone cream in lieu of a buttercream for the three teir cake for something different to try. I wanted this cake in particular to impress. I looked at countless photos of wedding cakes and youtube videos of making wedding cakes for inspiration and nailed the ability to effortlessly draw out a 3D picture of a teired cake with any number of designs on it. Pages and pages of designs.

Phase Two: Apprehension
The thing about looking at countless pictures of wedding cakes online, is that after a while they all begin to look exactly the same. The colours, the flowers, the general themes... it's as though all these cakes were taken out of the same book. However, with a generic cake look, comes an inherent expectation for that exact look. An expectation I was begining to believe would be very very difficult to meet. It was during this phase where I began to try scheduling myself to the minute. It was also here where I keenly chewed off each and every one of my carefully manicured fingernails. Delicious.

Phase Three: Calm
The thing about phases is that there is always one stuck in there that surprises you. In one single day I set out to (calmly) do everything on the schedule with no excuses or complaints. This meant that in that one single day I made 4 cakes, a lemon curd, lemon syrup, raspberry syrup, marscapone cream, and honey buttercream. That's right. Honey buttercream. And yes, it was as spring delicious as it sounds. Unsurprisingly, this was the least stressful part of the whole ordeal. I got to be creative and play with food the way I always have. It came naturally and I was able to dance through the kitchen listening to The Clash and Adam Ant without any worries at all. It was going to taste good (it was going to taste freaking delicious actually) and really, to me, that's all that has ever mattered.

Phase Four: Terror
The two teir cake was the project cake for the final class of my cake decorating course. As part of the criteria, I had to get as far as rolling the fondant onto the cake before the class. Everything else would added at the actual class itself. First off, let me say that fondant is the stupidest concept ever. You don't actually eat it, and putting it over a cake is most likely the reason I will die of a heart attack or stroke at 30. Forget high cholesterol--fondant is where my issues lie. That's not the terrifying part though. Oh no, that's only stressful. The Terrifying part is the part where I have to drive to the class with this cake place precariously on my lap. If it fell due to a sudden stop or turn I think I might have actually got out of the car and punched someone in the face. Little bit high strung at this point, needless to say.

Phase Five: Acute Panic
Cake number 2, the three teired cake that was commissioned, is covered in fondant, has some admittedly adorable ribbon wrapped around it, and a nicely piped string of pearls. AND IS SAGGING LIKE THE PARTS ON AN OLD PERSON!!! People ask whether it's themed as the leaning Tower of Pisa (so clever) and I am very concerned that the whole thing will topple over before I even get a chance to pipe on my carefully planned decoration. Is the cake inside alright? Has it turned into some kind of mouldy mush?? When I deliver it to my unwitting (possibly unwilling) partons, will they cut it open to find something green and hairy living inside?? All I want to do is peel back the blue fondant and check...

Phase Six: Sweet Relief (see also, pride or euphoria)
It's over. The whole ordeal has finally come to an end and I can see the cakes for what they are. They really are quite pretty. I don't think I've ever made anything that looked quite so beautiful before. It's almost a shame that they'll have to be cut into and devoured. They look like they're worth the time and effort (and maybe even the tears). I have to say that even the actual decorating part was exciting to the point where I didn't want to stop. Didn't expect that one!

When everything is all said and done, I think I learned more from making these two cakes these weeks than I could have learned reading any one of my many many books or online. I know that the next one will be easier only because there are so many things I would do just a little bit differently. I'm just going to keep my fingers crossed that the cake inside isn't actually green and hairy...

Tuesday, March 2, 2010

Best Buttercream Ever (it's gonna kill me...)

I’m twenty-two years old and according to my doctor, I have high cholesterol. This isn’t the good cholesterol that keeps your body fit and your brain active, no, this is the cholesterol that supposedly clogs your arteries like a bad traffic jam and results in your early -- and most definitely ugly-- demise. This comes off as somewhat of a slap-in-the-face to me not because of my age, but because of my “active lifestyle”, perfect weight range, and the fact that while I may be making loads of sugary confections every week, I very rarely eat more than a couple bites or a single slice. All this restraint and motivation, not to mention the hours spent peddling peddling peddling away on the stationary bike sweating buckets and going nowhere, has resulted in me feeling and looking good, but also having the chemical makeup of an eighty year old obese man!

I shouldn’t complain too much. I’ve done my own research and found that most recent studies on “bad” cholesterol have shown that it is in no way related to heart disease (and, in turn, in no way related to my early and ugly demise). This is a relief. A huge relief actually. The chart my doctor gave me listing the foods I was to stay away from and the foods I was “allowed” to eat was... extensive. To sum it up, I can eat any fruit except coconut, most vegetables, absolutely no butter or other milk products with more than... 0% Milk Fat, and as many egg whites and boiled chicken breasts as I want.

So when I discovered the Best Buttercream Recipe EVER--a recipe that contained 8 egg yolks and over a pound of butter-- I figured the best course of action would be to say a quick prayer to the gods of deliciousness, whip it up, and know that if my research was wrong and I suddenly died of intense artery cloggage, at least I’ll have died with a smile on my face.

Which brings me to the whole point of this rambling post, which would be to give you the recipe for a buttercream that I guarantee will make you moan softly, close your eyes in bliss and revel in the joy that comes from an image of fluffy pastel wearing angels dancing on your tongue. Ladies and gentlemen, don’t let the simplicity fool you, this is not your grandmother’s buttercream.


Buttercream
Adapted from Baking by James Peterson

8 egg yolks (I only used 6 because that was all that I had)
1.25 lbs unsalted butter just a titch cooler than room temperature cut into small pieces
2 cups sugar
2/3 cup water
2 tsp vanilla (or your choice of flavoring)

1. Pour your sugar and water into a heavy bottomed saucepan and boil on high until it reaches the "soft ball" stage. Meanwhile, beat the egg yolks on med-high speed in your mixer until they quadruple in volume and are very pale. About 10 minutes.
2. While the mixer is running, slowly pour in the hot sugar syrup careful not to touch the sides of the bowl or the beater itself.
3. Add the butter, one chunk at a time, waiting until each chunk is incorporated before adding more. Add vanilla.
4. The mixture should change suddenly and become very pale, thick, and fluffy.

Tuesday, February 16, 2010

In Which I Take a Running Jump at Rose's Heavenly Cakes

I had long anticipated trying out one of Rose Levy Beranbaum's cakes. She is, after all, the author of The Cake Bible--widely considered to be THE go-to book on cakes. So when my mom came home one day with Rose's Heavenly Cakes in the bag I was pretty excited to try out one of these "guaranteed to please" "impossible to fail" cake recipes.

Cut to four months later when I decide to excavate the cookbook from a huge mound of other cookbooks, and endeavor to make one of these cakes. Seeing as it was Valentine's Day, I thought it would be nice to make something festive. With this in mind, I dug up a heart-shaped cake pan from the basement (possibly circa 1994), bought a bottle of red food colouring, and set to work making a Rose Red Velvet Cake.

Let me start off first by saying that yes, this cake does in fact require you to open up a bottle of red food colouring and pour the entire contents of that bottle into a bowl of egg whites and vanilla, which will then be mixed into your cake batter. Do not wear any pieces of clothing that you actually care about when you make this cake. And for you own sanity, under no circumstances should you wear white. While the red looks beautiful and vibrant in the cake, it's only unmerciful and devastating on your favorite t-shirt.

That being said, the method used to make this cake is a bit odd. You only lightly beat the egg whites and add them after you've mixed the dry ingredients with the buttermilk and the butter/oil mixture. I'll admit that the cake turned out really nice and light with a subtle hint of cocoa that (oddly enough) only made the vanilla flavour stronger and more pronounced. My only problem with this cake was the icing. Beranbaum calls it her Dreamy Creamy White Chocolate Frosting, but I just call it... Strange. Maybe it was because I don't droll at the thought of white chocolate, and maybe it was because of the strong acidic overtones from the sour cream... whatever it was, this frosting was not for me. If I were to do it again, I would make the cake with a regular cream cheese icing. What can I say, I'm a traditionalist when it comes to my cream cheese icing!

Rose Red Velvet Cake
Adapted from Rose Levy Beranbaum's Rose's Heavenly Cakes (page 83)

3 large egg whites (room temperature)
1 bottle red food colour
1 1/2 tsp vanilla
2 cups flour
1 cup superfine sugar
3 tsp baking powder
1 tsp cocoa (for a darker red colour, add more cocoa and reduce the amount of flour you use)
1/2 tsp salt
1/4 cup canola or sunflower oil
4 tbsp unsalted butter at room temp
1/2 cup buttermilk

1. Preheat oven to 350F at least 20 minutes before baking.
2. Mix egg whites, food colouring, and vanilla in a medium bowl until lightly combined. Set aside.
3. In another medium bowl, mix together all the dry ingredients (flour, sugar, baking powder, cocoa, salt)
4. In the bowl of a stand mixer fitted with the paddle attachment, mix the butter and oil on medium speed for one minute (it won't be smooth, so don't worry too much about this bit). Add the flour mixture and the buttermilk while the mixer is on low speed. Raise the speed to medium for about 1.5 minutes or until everything is mixed together well.
5. Starting on medium-low speed, gradually add the egg mixture to the batter in two parts, beating on medium speed for 30 seconds after each addition.
6. When all in mixed together nicely, scrape the batter into your prepared pan and carefully smooth the surface. Bake for 25-35 minutes, or until a cake tester inserted into the centre comes out clean.

Thursday, December 31, 2009

My Quest to Understand Cheese

I don't like cheese.

For as long as I can remember, the only cheese I would eat would be the kind melted on pizza, nachos or inside a grilled-cheese sandwich. And the only way it tasted any good was if it was heavily laced with salt, pepper, pickles or ketchup. I limited myself to cheddar and mozzarella. Parmesan smelled like bile (it IS made of bile...), brie smelled like dirty socks, and havarti had the weirdest texture that I just could not get used to no matter how many times I tried it.

My Austrian grandparents love their cheeses. Gouda and swiss emmental especially. You sit down for lunch and no matter what it is you're about to eat, there will be a platter with gouda and swiss cheese handily sliced up for everyone to enjoy. However, while everyone else is blindly masticating, I sit there and think about how it smells like a pile of pungent old laundry mixed with a unique sour smell that I can't even describe. My mom is also a huge fan of melting brie cheese in the microwave and eating it with a spoon. The smell of the melting cheese permeates the whole entire house so that you can't escape the heavy musky odor.

But over Christmas, with all the wines and cheeses and crackers and people, I was peer pressured into trying some different cheese. And in doing so, I discovered Boursin cheese. It's light and fragrant and has the consistency of butter. It doesn't even smell like an old man's body odor! I went back for cracker after cracker until the whole ball of cheese was gone and I was picking up loose crumbs of cheese with my fingertip.

From here, I decided to begin a quest to try and understand people's love for cheese.

I can say that I've made a conscious effort to buy new and different types of cheeses to try in recipes, like applewood smooked cheddar in potato soufflees (recipe here, from Almost Bourdain). I've made these soufflés a few times, and the best was when I incorporated the applewood smoked cheddar instead of regular cheddar or parmesan. It adds a whole new level of subtle flavor to the dish that you can't get with just spices, salt and pepper.


So while I won't claim to love cheese, I will say that I am trying to understand the (odd) fascination some people seem to have with it and use it to my advantage.

Thursday, October 22, 2009

The Chocolate Chip Cookie Campaign


You see posts and articles and rants about the "perfect chocolate chip cookie" all over the interweb. Semi scientific experiments and surveys done to see which is method is the best and which methods should be discarded forever into the trash can of history. I will admit that not too long ago I got sucked into the great chocolate chip cookie debate and found myself making dozens of cookies each week. Eventually I came to the point where I realized this important fact: I don't really like chocolate chip cookies. Yes, one or two of them is nice when they're warm and chewy and the chocolate is all melty, but really, any more than that and I'll pass.

However, I did have loads of fun baking batch after batch of delicious cookies to share with my family at home and the people I work with (the guinea pigs, if you will). What I discovered is that most people will agree that putting the dough in the fridge for a while before you bake it generally makes for nicer looking cookies with soft chewy centres. On the other hand, having to let your dough rest in the fridge for 36 hours as perscribed by the New York Times is a bit extreme. Using melted butter was an interesting adjestment made by Cooking Illustrated, but I think overall that it made no real difference in the flavour or texture of the cookies. The last thing that i noticed has been played around with a lot in these recipes was the type of flour used. Whether it be bread flour, cake flour, all-purpose flour, or some combination, not one single baker seemed to agree on the results. About this, all I can say is that when it comes to baking cookies at home, I think finding a recipe that uses all-purpose flour to its best potential is the way to go.

To read a more extensive account on the trails and tribulations of finding the very best chocolate chip cookie recipe, I would very much recommend that you visit this blog here.