Showing posts with label sur la table. Show all posts

Saturday, September 25, 2010

Pumpkin Loaves of Lub


That's "lub", not "lube", you crazies! Everyone always gets that wrong...

Anyway!

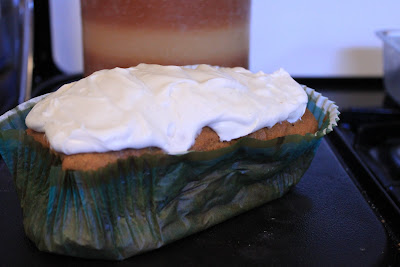
I made these pumpkin loaves and I was told that they were delicious. I don't really know whether they were or not myself because they were all gone and eaten before I could get a taste. The loaf itself was a pretty strait forward pumpkin loaf with walnuts just topped with an exceptionally delicious cream cheese icing flavored with lemon and vanilla bean. I'm told that they were moist and light--not heavy and dense like most pumpkin loaves that you find around town (shameless self promotion right there...). Instead of the required vegetable oil, I used some walnut oil that I found sitting at Winners and I think it really helped bring out some of the flavor. It's the little things.

The challenging part of these little loaves were the silly little loaf liners designed by the geniuses at team Paula Deen. Too awkwardly sized for any rational loaf pan, these liners look cute, but only cause unnecessary frustration. To make them fit better, I filled the empty space with aluminum foil, and this is the result:

The only thing that saved me from extreme shame at these misshapen trolls of the loaf/cake world were the adorable little boxes that handily went with the liners (all on sale at Michaels for 70% off!). I almost look like some kind of professional when I use these!

If you want to make these for yourself, they're very simple--just your basic muffin method at work here! I doubled this recipe easily and substituted walnut oil for vegetable oil, but other than that, this is pretty much it.

Pumpkin Walnut Bread
Adapted from The Art and Soul of Baking by Cindy Mushet

2 cups all-purpose flour
3/4 tsp baking soda
1/2 tsp cinnamon
1/4 tsp allspice
1/4 tsp ground cloves
1/4 tsp ground ginger
1/4 tsp salt
2 large eggs
1/3 cup water
1 1/2 cups sugar
1 cup canned pumpkin puree
1/2 cup vegetable oil
1 tsp vanilla
1 cup chopped walnuts (toasted)

1. Preheat oven to 350ºF. In a large bowl whisk together first seven ingredients until thoroughly blended. In a separate bowl, whisk together eggs, water, sugar, pumpkin, oil, and vanilla.

2. Add the pumpkin mixture to the dry ingredients and whisk until blended and smooth. Add walnuts and stir. Pour batter into prepared loaf pans and level off the tops.

3. Bake for 55-65 minutes, until the bread is firm to the touch and a toothpick inserted into the centre comes out clean. Transfer to a rack and cool before adding cream cheese frosting.

For Cream Cheese Frosting:
Combine 12 ounces softened cream cheese, 3 ounces softened unsalted butter, finely grated zest of one lemon, 10 ounces powdered sugar, and 1 1/2 tsp vanilla in a mixer. Beat until smooth.

Tuesday, August 31, 2010

Comfort Food: Blueberry-Blackcurrant Muffins


It's nearing the end of summer here. In fact some say that the summer had already come and gone by the middle of August. Yesterday I had to put on a sweater and crank the heat in the car. This seems somehow... wrong. Unfair even. The only thing I had to make up for the dismal weather was a bowl of blackcurrants I had picked the day before. Yes, I am that weird woman in her short shorts, batman t-shirt and Lindsay Lohan shades holding a little white bucket, picking currants off the bushes in public parks. I'm doing the city a service. And you can't stop me!

Anyhow...

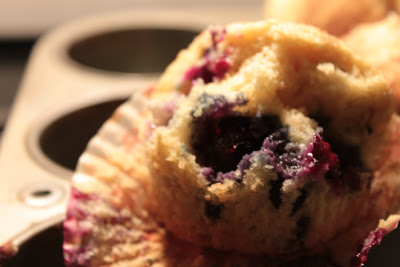
I decided that the currants would go pretty well inside muffins with some blueberries. What I didn't count on was how much of a pain it would be to de-stem each and every one of these finicky little berries. I think I sat through 2 episodes of Mad Men while cleaning and separating (I didn't miss much--Don Draper was dashing and intense, Peter Campbell was creepy and intense, Peggy Olsen was weird and intense, and Roger Sterling was busy getting syphilis).

In the end, I managed to produce these delicious cakey muffins adapted from Sur La Table that were all eaten while the berries inside were still molten hot. Always a good sign I think.


Easy Morning Muffins with Blueberries and Blackcurrants
Adapted from The Art and Soul of Baking by Cindy Mushet, page 148

2 cups all-purpose flour
2/3 cup plus 1 tbsp sugar
2 tsp baking powder
1/2 tsp baking soda
pinch of salt
3/4 stick of butter (unsalted)
finely grated zest of one lemon (I used 1 tsp lime oil instead and it was really yummy)
2/3 cup buttermilk
2 large eggs, at room temperature
1 1/2 tsp vanilla extract
6 oz fresh blueberries
4 oz fresh blackcurrants

1. Preheat oven to 400ºF. Prepare muffin tins. Blend together flour, 2/3 cup sugar, baking soda, baking powder, and salt in a large bowl. In a medium skillet, melt butter with the lemon zest. Turn off the heat. Add the buttermilk to the melted butter and let sit for 1 or 2 minutes. Add eggs and vanilla to butter and mix well.

2. Make a well in the centre of the dry ingredients. Pour the butter mixture into the well and stir gently. Mix only until there are no more streaks of flour or pools of liquid and the batter looks fairly smooth. Gently fold in berries until evenly distributed.

3. Divide batter evenly among muffin cups. Sprinkle remaining sugar over the tops of the muffins.

4. Bake for 18-20 minutes, until the tops feel firm and a toothpick inserted comes out clean.

Friday, March 26, 2010

Project Cake Number THREE and my SECOND cake commission

It's hard for me to decide where to start this post and what exactly to do with it. This week I had two multi-tiered cakes due that both needed to be decorated to perfection while still maintaining my high standards for taste (ha! how's that for high class food jargon!). I've always struggled with timing when bake, so this week I made an exact schedule that I was to follow to the minute if I was going to finish these cakes, go to work, and maintain some semblance of sanity. A very loose semblance of sanity.

But like anything, there were many phases that I went through to complete these two cakes on time and without throwing any sharp objects.

Phase One: Excitement
It was at this (misguided) first phase where I decided it would be a good idea to go for a three teir cake and a two teir cake. Lasting approximately 3 days, I made over two dozen fondant roses and rose buds in various creamy pastel colours while watching BBC dramas on the tv. After taking out every baking book I owned, I settled for a "simple" sponge cake that I could put together and freeze no problem. I would also whip up a marscapone cream in lieu of a buttercream for the three teir cake for something different to try. I wanted this cake in particular to impress. I looked at countless photos of wedding cakes and youtube videos of making wedding cakes for inspiration and nailed the ability to effortlessly draw out a 3D picture of a teired cake with any number of designs on it. Pages and pages of designs.

Phase Two: Apprehension
The thing about looking at countless pictures of wedding cakes online, is that after a while they all begin to look exactly the same. The colours, the flowers, the general themes... it's as though all these cakes were taken out of the same book. However, with a generic cake look, comes an inherent expectation for that exact look. An expectation I was begining to believe would be very very difficult to meet. It was during this phase where I began to try scheduling myself to the minute. It was also here where I keenly chewed off each and every one of my carefully manicured fingernails. Delicious.

Phase Three: Calm
The thing about phases is that there is always one stuck in there that surprises you. In one single day I set out to (calmly) do everything on the schedule with no excuses or complaints. This meant that in that one single day I made 4 cakes, a lemon curd, lemon syrup, raspberry syrup, marscapone cream, and honey buttercream. That's right. Honey buttercream. And yes, it was as spring delicious as it sounds. Unsurprisingly, this was the least stressful part of the whole ordeal. I got to be creative and play with food the way I always have. It came naturally and I was able to dance through the kitchen listening to The Clash and Adam Ant without any worries at all. It was going to taste good (it was going to taste freaking delicious actually) and really, to me, that's all that has ever mattered.

Phase Four: Terror
The two teir cake was the project cake for the final class of my cake decorating course. As part of the criteria, I had to get as far as rolling the fondant onto the cake before the class. Everything else would added at the actual class itself. First off, let me say that fondant is the stupidest concept ever. You don't actually eat it, and putting it over a cake is most likely the reason I will die of a heart attack or stroke at 30. Forget high cholesterol--fondant is where my issues lie. That's not the terrifying part though. Oh no, that's only stressful. The Terrifying part is the part where I have to drive to the class with this cake place precariously on my lap. If it fell due to a sudden stop or turn I think I might have actually got out of the car and punched someone in the face. Little bit high strung at this point, needless to say.

Phase Five: Acute Panic
Cake number 2, the three teired cake that was commissioned, is covered in fondant, has some admittedly adorable ribbon wrapped around it, and a nicely piped string of pearls. AND IS SAGGING LIKE THE PARTS ON AN OLD PERSON!!! People ask whether it's themed as the leaning Tower of Pisa (so clever) and I am very concerned that the whole thing will topple over before I even get a chance to pipe on my carefully planned decoration. Is the cake inside alright? Has it turned into some kind of mouldy mush?? When I deliver it to my unwitting (possibly unwilling) partons, will they cut it open to find something green and hairy living inside?? All I want to do is peel back the blue fondant and check...

Phase Six: Sweet Relief (see also, pride or euphoria)
It's over. The whole ordeal has finally come to an end and I can see the cakes for what they are. They really are quite pretty. I don't think I've ever made anything that looked quite so beautiful before. It's almost a shame that they'll have to be cut into and devoured. They look like they're worth the time and effort (and maybe even the tears). I have to say that even the actual decorating part was exciting to the point where I didn't want to stop. Didn't expect that one!

When everything is all said and done, I think I learned more from making these two cakes these weeks than I could have learned reading any one of my many many books or online. I know that the next one will be easier only because there are so many things I would do just a little bit differently. I'm just going to keep my fingers crossed that the cake inside isn't actually green and hairy...

Thursday, October 15, 2009

the one that bites back...


Have you ever put a lot of thought into the cranberry? Honestly, have you? That bizarre little bud of a fruit that only really comes out at family dinners doesn't get a whole lot of consideration when placed next to the traditional holiday fruits (whatever they might be...). You get a little dollop of cranberry sauce plopped right in between the turkey and the stuffing and that little bit of tart sweetness is usually just enough to add a nice bit of contrast to your otherwise savory-studded meal.

Cranberries are weird. For a little fruit that pretty much grows in swamp-like conditions, it is super dry when you cut it open. I mean, if you eat a cranberry uncooked just by itself, it will suck every drop of moisture right out of your body within seconds. And that's exactly what it tastes like too. You pucker your lips and squint your eyes when you bite into that berry or even when you take a sip of cranberry juice. It's potent stuff! Also, unless you happen to slice your own cranberries (and forgo the canned variety for family gatherings), you might be interested to know that the inside of the hollow berry is a startling white with little seeds shaking about in there.

How do I know all this? Well, after Thanksgiving had come and gone and the turkey carcass had been picked over by my fellow vultures until there was not much left that could be considered edible in polite company, I realized that I still had a batch of cinnamon spiked pie dough in the fridge and a whole bag of fresh cranberries that needed to be used up. So while the emaciated bird carcass sat stewing in a pot over the stove with some celery and carrots, I looked for a nice pie recipe that would use up my dough and my berries. Not surprisingly, I found a promising one in my Sur La Table The Art and Soul of Baking book (this book is more of a tome...). However, I haven't been having very good luck with the recipes in this book lately. In fact, Most of the ones I have made have turned out kind of... mediocre at best and inedible at worst. But I figured that the book deserved another chance, and opted to throw together a cranberry crumble tart mostly because it meant that I wouldn't have to leave the house to get any more ingredients.

I gotta say, consider the book redeemed. That tart was fantastic.

The filling was sweet, but had a definite bite and the orange zest that was mixed in with it gave it a nice smooth taste that evened everything out. There was a simple mild crumble topping that worked out to be lovely with the cranberry filling that had such an intense flavor. I could even go so far as to say that the texture of the tart was just right--crunchy on the top and the bottom but nice and soft inside. I even dug through the freezer and got out some ice cream to go with it, and for me, the added cream made the whole dish perfect (although I would say that ice cream can make anything perfect).

So this one dish redeemed the Art and Soul of Baking for me. I guess in that respect it DID certainly bite back.

Monday, October 12, 2009

thanksgiving pie politics...


This Thanksgiving I endeavored to make the pumpkin and apple pies that would follow the meal. This already was cause for a significant amount of consternation as it would mean that my grandmother wasn't making the dessert and it would be, by default, "just not THAT good". That was fine. I've dealt with this pressure before and I would have to put up with it again. I'm used to it.

To change things up a bit, I decided that it might be interesting to do a bit of a variation on the classic pies by topping the pumpkin pie with Italian meringue, and mixing in a few pears with the apples in the apple pie. Only a small part of me wanted to do this just to enrage my family of die-hard traditionalists. Maybe not that small...

I got the idea to top off the pumpkin filling with meringue from an old post by Tartelette and a desire to use my brand new kitchen torch for the very first time. I doubled the recipe for the pumpkin filling given by Tartelette, and used Jamie Oliver's recipe for pie dough, spiking it with a pinch of cinnamon to give it a little bit of extra flavour. That was all pretty standard. The dough rolled out nicely and the filling baked nicely after about 40 minutes in the oven (instead of the recommended 20). The interesting part came when I made the meringue. Now I have made French meringue for pavlovas and individual meringues, and I have made Swiss meringue for buttercreams, but I have never attempted (or seen the need for) Italian meringue. Bringing water and sugar to a boil and then up to 245 degrees (F) while beating the egg whites into peaks seemed a bit extreme. I mean, you need a candy thermometer to pull it off and meringue is supposed to be simple! Needless to say, I was a little bit aprehensive going into this.

But the desire to finally put to use my fancy new kitchen torch spurred me on.

And I was stunned at how easy it was.

I admit, it was a little bit annoying having to wait for the sugar syrup to get hot enough (it had to reach the "soft ball" stage), but once I poured it into the beaten egg whites, you could see the meringue taking shape almost instantly. The hot syrup cooked the eggs and it became a big, soft, fluffy, mass. Kind of like a soft marshmallow. And it tasted delicious. Absolutely decadent. I plopped the fluffy whiteness onto the cooked pumpkin pie, and then played with it until it looked just the way I wanted.

Then I got to fire up my torch and caramelize the edges. It smelled just like roasting marshmallows. Tasted like it too...
The reviews for this pie were mixed. I liked it a lot. It was traditional enough that it still had that same spicy pumpkin taste with a nice flaky crust, but the added soft meringue made whipping cream unnecessary and made the dish nice and light. Others, however, were not as keen on it as I was (my sister refused to eat the meringue portion of the pie in an effort to boycott change).
I thought the apple pie was pretty good too... I ate a huge piece of it for breakfast this morning.

Tuesday, October 6, 2009

Soufflé #1: Raspberry Soufflé


It's the smell. That has to be it.
The thing that compelled people to continue to conjure up soufflé after soufflé in France had to have been the smell because that in itself is pure decadence. There have been whole industries dedicated to bottling that smell. To put it very simply, it's the smell of raspberries, but honestly it's more than that. It's a clean smell - not altered or enhanced or changed in any way. And it fills the entire house within minutes so that every room you go into seems as though it's got a pink haze. I dare you to find a scented candle that will do that!

Unfortunately though, while the scent of these raspberry soufflés was enchanting, that was pretty much all this dessert had to offer.

I learned right off the hop that if you've made a soufflé with the intent to impress someone, that someone better be there to eat it the second you pull the ramekin out of the oven. This is because, while your soufflé will most certainly look jaw-droppingly impressive (possibly to the point of even being somewhat daunting) when you pull it out of the oven, that will only last about 4 minutes. If that.
My soufflés today came out of the oven towering a whole 4 inches over the top of their little ramekins, but by the time they were 5 minutes old, some of them had sunk nearly an inch below the rim. Fail. This might just be the particular recipe I was using, as it contained no flour or anything like that for structure.

These little soufflés definitely did not taste like I had expected. I thought it would be like eating raspberry mousse - light, fluffy and as pure and natural tasting as the smell had led me to believe. Suprisingly, it tasted more like a raspberry candy. Almost sickly sweet even. Combined with the custard-like texture, I didn't quite know what to make of this dish. It's not that it was bad... it was just not something I would choose to eat on a regular basis!

However! I chose to make this particular soufflé because I had 6 egg whites that I needed to use up as well as a few cups of raspberries that were getting a bit old. I had less than an hour in which to make this dish start to finish, and to be completely honest I was done with half an hour to spare. There are three steps in this recipe and it's simplicity made me constantly check and re-check it to make sure I didn't miss anything. So as far as efficiency goes, this definitely gets a gold star.

I should probably add that if I were after a recipe that was gluten-free, extremely low on sugar, or completely fat-free, this dish would have been perfect. However, I am a fan of flour, fat, and sugar, so this was not at all what I had expected. Soufflé #2 will be better!!

Recipe:
Raspberry Soufflé
(Adapted from the Art and Soul of Baking, by Cindy Mushet)

12 oz fresh or frozen raspberries
1 tbsp plus 1/4 c granulated sugar
5 large egg whites

1. Preheat oven to 400 degrees (f). Puree the raspberries in a food processor and then run the puree through a strainer to get out all the seeds. You should end up with 1 cup of smooth seedless raspberry puree. Stir in the 1 tbsp of sugar.
2. Whip the egg whites on medium speed until they form soft peaks. With the mixer running, rain in the remaining 1/4 cup of sugar and beat until stiff, glossy peaks form. Stir 1/4 of the egg whites into the raspberry puree to lighten the mixture. Fold the remaining whites in until there are no more streaks of white.
3. Pipe the soufflé batter into 10 3 oz individual buttered ramekins until flush with the rim. Bake for 14-17 minutes, until set and firm to the touch in the centre. Dust with confectioner's sugar and serve with créme fraîche. Devour immediately.